Sunday, June 30, 2013

Pistachio Nut Ice Cream

Helping Mom recently with her yard sale, I discovered she had two ice cream makers.  She has always made the best homemade ice cream!  Because Stephen, Andrew and I are ice cream-a-holics, I thought I'd borrow one and give it a shot.

Inspiration......On my trip last October to California to visit Cuzzin Thom and his family, their good friends Guy and Marge entertained us with pizza from the coolest brick pizza oven AND homemade pistachio ice cream. Marge is the cook I want to be.....between all the moments of laughter at and with each other, she manages to come up with dishes that make you stop before taking your first bite...... Here in Virginia we'd say....Guurl! Don't EVEN talk to me right now cuz this is some kinda good! MmmmHmmmm! Check her out here...http://marge-alicious.com/ and thanks Sunshine for feedin' me good....Guurl! And............. of course a little Dithinuuurz conversation never hurt anybody!
Thom & Guy preparing the oven!
Months later, I'm finally going to try it and started my search via google to find a good recipe. Within minutes I found a web-site and of course I had to check it out giving my brown-eyed sisterhood some props!  Just the pictures alone had me hooked! http://www.browneyedbaker.com/2009/08/12/pistachio-nut-ice-cream/
 I cannot take any credit for the recipe listed below.  It's all the Brown Eyed Baker and the credits she provides at the end of the recipe.  However......because it is so delicious I had to pass it on for you to try. 

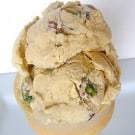
Success!  It was actually very easy and I ended up having to let the custard sit overnight in the refrigerator because I waited too late to start making it. (Make sure you take into consideration cracking and picking the pistachio nuts) But, by doing that, it only took a short time in the ice cream maker.

I couldn't wait to try it and took a few bites from the canister and offered Andrew the plastic blade (talk about licking the spoon - what a treat!)  Everyone else decided to wait until later, but I fixed myself a bowl and sat right down and enjoyed every morsel!  I could eat this breakfast, lunch and dinner! 

Special thanks for Marge for the inspiration and Michelle of Brown Eyed Baker!

Pistachio Nut Ice Cream

Yield: Makes about 1½ quarts
Prep Time: 30 minutes (active) 8 hours (inactive)
Cook Time: 15 minutes
Total Time: 45 minutes

Ingredients:

1 1/3 cups shelled pistachio nuts
¾ cup sugar
2 cups heavy cream
1 cup whole milk
Pinch of salt
6 large egg yolks
1 teaspoon vanilla extract
½ teaspoon almond extract
¾ cup pistachios, coarsely chopped

Directions:

1. Grind the 1 1/3 cups of pistachios in a food processor until finely ground, but not to a paste. Set aside.
2. In a medium saucepan, warm the milk, sugar, 1 cup of the cream, and salt, stirring to dissolve the sugar. Stir in the ground nuts. Cover, remove from the heat, and let steep for at least 30 minutes.
3. Strain the warm nut mixture, pressing on the nuts to extract as much liquid as possible, and discard the solids. Return the milk and cream mixture to the saucepan. Pour the remaining 1 cup cream into a large bowl and set a mesh strainer on top. In a separate medium bowl, whisk together the egg yolks. Slowly pour the warm mixture into the egg yolks, whisking constantly, then scrape the warmed egg yolks back into the saucepan.
4. Stir the mixture constantly over medium heat with a heatproof spatula, scraping the bottom as you stir, until the mixture thickens and coats the spatula. Pour the custard through the strainer and stir it into the cream. Add the vanilla extract and almond extract and stir until combined.
5. Refrigerate until cold. Pour into an ice cream maker and freeze according to the manufacturer’s directions. Once finished churning, fold in the ¾ cup pistachios with a rubber spatula.
**You’ll notice this pistachio isn’t bright green like you find in stores. I didn’t use any food coloring, so this is all natural, but you can add a couple drops of green food coloring if you’re looking for a deeper green shade.
(Ingredients and methods/techniques adapted from a combination of The Joy of Cooking, The Perfect Scoop by David Lebovitz, and Epicurious)


Saturday, June 29, 2013

Like it-Share it-WIN it!

Click it-Like it-Share it-WIN it!
Because it's Saturday and the sun is shining and I'm feeling pretty daggone good!  I'm offering this handcrafted silverware pendant.........FREE!  All you have to do is Like it and Share it on FB or add a comment below! (If you opt to select 'anonymous' to add your comment to avoid making a profile...make sure you put your name in the comment too!)
One rule - your comment has to have the word NICE in it.  As a country we need to add NICE back into our daily MO!  Go for it and I'll have my handsome husband draw the lucky winner on July 4th!

Sunday, June 23, 2013

Tutorial: Paint it with words- Recycled painting

I'm a thrift store junkie and on most every trip, I'd see lots of paintings with cool colors and all but I wasn't really looking for a painting with a beautiful sunset accompanied by a pack of wolves.  However, after learning how to do this technique, I couldn't get to the local thrift stores quick enough.  What?  No paintings?  Not good.  I couldn't even find an old canvas that I could repaint myself! 
Finally, a trip to Richmond to visit my sister (love her!) I found one at her local Goodwill store. $4.98....on sale for $2.98!  The only draw back is, it's not on canvas.  However, the colors are right and if nothing else.....it will be a learning tool.  SOLD!
I'm new at this tutorial business, so I'll apologize ahead of time for forgetting to take photos of the different stages.  I'll get better with each project.

Paint it with Words - Recycled Painting

Supplies:
  • painting to recycle (forgot to take a 'before' picture)
  • pencil
  • off-white acrylic paint (or color(s) of your choice)
  • flat-square paint brush
  • foam brush
  • sticky letters-numbers, etc. (Walmart has them for about $2.00)
    • Homework:  Find quotes, words, lucky numbers, etc. for your sign.  Make sure when purchasing letters/numbers, you allow for letters used multiple times.
    • Do not let the stickers stay on the painting overnight.  They might peel off some of the original painting if allowed to set up.
  • stain
  • needle or pin
  • old sock
  • ruler and/or straight edge
    Letter/number stickers
    
    
    Off-white acrylic paint
    
    
    Flat-square paint brush
    

Once you decide the order of your quotes, words, etc., measure your letters/numbers to make sure you are allowing enough space from the top.  As you are spelling everything out (check for mistakes!), it's OK to use different size letters when you are changing to another quote or word.  Find something as a 'space' marker for marking the space in between rows (tape measure, piece of paper, etc.)
Start applying your letters/numbers, making sure to smooth out the edges.
Be creative and turn some words, numbers on the side (Great Day...is a favorite saying Dad used to say and Stephen and I were married on December 25th - so yes, it was a 'great day')

Measure and make sure your lines are straight!
Next, using the acrylic paint and flat-square paint brush start re-painting the painting.  Start with the letters/numbers and brush from the inside out.  (If you brush into the letter, you risk getting paint underneath the letter).  Keep going until the entire painting is off-white. Let dry for about 20 minutes and repeat the process.
Keep brush flat and paint from the inside out.

Almost finished......

One coat finished.


If this were a canvas, the brush strokes would not show as much.  But because this is printed and sealed onto the wood, I didn't care for the brush strokes.  After letting it dry for another 15+ minutes, using a wadded up paper towel (sponge, sock, rag) I dabbed the 3rd coat on to eliminate the brush strokes.  Let dry for 30 minutes, making sure the entire painting is dry before moving on.
Oops!  I removed two letters before remembering to take this photo!


I decided to use stain to make it look older, but you can eliminate this step or use a lighter stain. Using the foam brush and only working in small sections at a time, brush on the stain and wipe it off with the old sock.  Move the sock in a circular motion and work the stain into the paint.  Repeat until the entire painting is covered.  Let dry for 15 minutes.

Using the straight pin/needle, lift up the edge of each letter and carefully peel them off.  I was able to salvage a few letters and will reuse them again. 
Be careful you don't remove some of the original paint with the pin.

After all the letters/numbers were removed, using the old sock with the stain residue on it, I went over some of the spots that I thought needed to be darker. 

Project complete!


We all have favorite sayings, quotes, lucky numbers and I hope this tutorial inspires you to paint with words too. If you do, please share your photos and have a Great Day!
Love ya...mean it!
Robin

Tuesday, June 18, 2013

What is a lost cause?

What makes a situation or a person a 'lost cause'?  I'm divorced...twice!  Surely, that makes me a lost cause.  The woman who was just told she has breast cancer.  Surely, that is a lost cause too.  A category 5 tornado just went through your town and leveled your home and every other home within 5 miles!  Now THAT is a lost cause! This post was easy and I was finally able to determine what a lost cause is!

Ssssqqqquuueeeerrrrcchchchchch.  STOP the press!

Now let's get back to this "D" word!  Much to my better judgement, and me thinking that I had the whole situation under control at all times.....I may not have listened when I should have and may not have always made the best of decisions.  But...that doesn't mean I'm a lost cause!  Far from it! 

I have a long list of reasons why and the first four on the list are Stephen, Robbie, Ashley and Andrew (and of course their beautiful families!)..followed by words like...Strength, Character, Patience, laughter.....forgiveness....worth repeating ....forgiveness, and many more reasons why I, am not a lost cause.

Being told you have cancer must surely be devastating.  Or, any other chronic or potentially terminal illness.  I speak to people every single day that would debate 'devastating' with you.  Some say being diagnosed was the best thing that ever happened to them because...I found myself, or I'm stronger now than I've ever been.....I'm in better health now than I was in my 20's. 

For a doctor to tell a patient, it's a lost cause and there is nothing else we, or you, can do....Oh Buddy you'd better buckle up because I'm going to rock your co-pay collecting world and be here every day if I have to, to beat this!  But, this will NOT be a lost cause!

Ask the folks of More, Oklahoma what it's like to be in the midst of a lost cause.  Ain't nobody got time for dat............they are rebuilding their lives, their town, their streets.  But they don't have to rebuild their hearts and their determination to bring their town back to life.  Have you seen how this town (and many others affected by natural disasters) has come together to make this happen?  You may have even contributed to this cause.  But it's surely not a lost cause.

We've all been there and made a bad decision or two, or three, or twelve.  We even call in the troops of Facebook, Instagram, work circles, Church friends, party friends to get us through these difficult times and make us feeeeeeelll better.  Is this a good idea?  Maybe-Maybe not.  But, the decisions we make, the news we face or the blow of devastation that just hit us square in the jaw....does NOT make you a lost cause.  We find the courage from somewhere to keep on keepin' on and move on!

Rushing into the house after spending 2 hours at Walmart buying groceries, loaded down with too many bags because you refuse to make two trips......drop everything to barely make it into the bathroom - WHEW! Only to find there is NO toilet paper....THAT is a lost cause! (But not really...because I didn't like those underwear anyway!)

Saturday, June 8, 2013

Painted Washer Necklace-Tutorial

Brave I know!  Allowing my 3 year old grand-daughter to 'paint' with fingernail polish took close supervision. I repeat close supervision.  And yet, I managed to spill some on the tablecloth.
Peyton wanted to make something and I just so happened to have some nail polish, washers and beading string........just lying around. For the sake of time, we didn't paint both sides, but I recommend adding this step because your washers will flip over on your necklace, bracelet, etc.

Variety of colors, including clearcoat

Step 1:  Paint each washer with a light color polish as your base color.  Because I was Peyton's assistant, I did this step to save time...while she was picking out her favorite colors.  Peyton, "Grammie, I want to use pink and blue and green." ......I'm sorry Peyton, Grammie doesn't wear blue or green fingernail polish! (Oh my!)
Only a light coat for this step!

 Step 2:  Using the nail polish colors selected, paint.  Peyton was the artist and she used a combination of colors and they turned out quite beaunimous! (Again, I'd recommend letting the first coat dry completely and then paint the 2nd side too)
Artist in the making!
Step 3:  Coat all the painted washers with a clear coat of nail polish and let dry.  The drying process only takes about 15 minutes (or less).
Step 4:  I used a black beading string to make the necklace and cut it about 48" long.  Double it and make a loop knot.  Because I didn't think we had enough washers to make a long necklace, I made another knot in the string about and inch down from the loop know - just to make it a little longer.
Loop knot and second knot

Step 5:  Feed the first washer onto the necklace.  Feed one end of the string through the hole from the top and feed the other end of the string up from the bottom.  Bring them both together to give you the criss-cross look in the middle and knot it. **Make sure as you are knotting, you are even all the way through.  You'll see after I fed the first two on, I made my knots a little closer.  That's because I didn't want the washers to flip over. As I got to the last two washers, I had to once again space them out a little more to be even with the other side.
Note the criss-cross in the middle.
Step 6:  Once you've fed all the washers onto the string, finish it off by adding a lobster claw clasp (or clasp of your choice) and knot it off.  Depending on the string, I'll add a dab of clear fingernail polish to seal the knot.  I added a split-ring to the original loop knot and you are done!
Lobster claw clasp and split-ring

Peyton's finished necklace!  It turned out pretty cool and her Mommy loved it!
Those of you that know me.....background for the photos was a lesson I had to teach Peyton too.  She selected the menu from last night's dinner!
Ashley is going to take a photo of the necklace on her neck and send it to me so we can showcase Peyton's talent.  The washers were 100% Peyton (3 years old) and I couldn't be happier.  Grammie loves ya  PeyPey!

Wednesday, June 5, 2013

Happy Birthday to Me!

In preparation for my trip to Maryland to see long time high school friend, Tommy Nelson....I trimmed my fingernails.  Weird.  But not so weird if you are picking up a banjo.  And....want to start playing it.
Well, I quickly learned you don't have to trim your nails, you have to CUT your nails on the left hand and wear these Edward Scissorhands looking contraptions on your right.  No worries.....it's sexy! That's what Minnie Pearl said anyway! So the sounds I was 'trying' to make didn't sound even worse, off went the nails. 
Tommy gave me strict instructions that I had to pick it up and play it every day...and I have!  I'm no Earl Scruggs, that's for sure.  But, I've played it every day.  I wish I'd done a video the very first time I did it.  I waited until Stephen was off doing something so nobody would hear me.  I played for about 5 minutes and then my arm started hurting, it was difficult to hold, and I told myself just how long this journey would be and had a good laugh!
With a little help from YouTube and my banjo pickn' friend Tommy, I've learned a few things and I'm getting there. I've always wanted to do this and just never have (no excuses) and now I am - Happy Birthday to me!  I'm trying to start lessons but finding someone with time that will accomodate my schedule, has been the challenge.  I'm determined - so it WILL happen!
Hee Hee Hee - Haw Haw Haw - Ya'll come back now - ya here?


Sunday, June 2, 2013

Thumbs up Dad!

Dad's fire engine red 1956 Ford truck!
I can't imagine kicking off the start of my blogging adventure with anything other than MY truck!  OK - Dad's truck!  But I did have my own set of keys!
As a young girl, I cannot imagine life being any better growing up.  I attribute my unique style and desire to create to family, lifelong friends, go-karts, backyard concerts, fishing and....the keys to my Dad's '56 Ford truck!
Those of you that know me, know I loved that truck!  The first day I was able to drive it to school (excited beyond belief!) I made sure it had the perfect shine and off to school I went.
I let off the gas to cruise into the Bruton High School parking lot, the mufflers still at a low rumble.....I backed it in to my designated parking spot.  Checked my hair, checked my teeth and within minutes.....every boy in the parking lot was surrounding MY truck!  Followed by a handful of girls with hands on hips, and yes even way back then we rolled our eyes and necks!  Not much time to talk so I grabbed my bat bag out of the back and off we go to class.......I didn't have to say a word.
This ol' truck was my chariot to the beach (Oh-the miles I put on it to the beach!), the skating rink, and just crusin'.  I loved the feeling it gave me to be behind the wheel of such a beautiful machine and I was different. I had strict instructions on how to 'take care of her' and knew if I wanted to continue driving her, I had to obey the rules.  "Keep gas in it.  Don't park around other cars.  NOBODY else is allowed to drive it.....but he never said "Don't race it."
My relationship with my Dad (Oh goodness, I need tissues!) was the best!  During his final months, we talked about a lot of memories to the point of tears of laughter.....including the truck.  I decided to confide in him about this one and only time I was driving it.  I'll refrain from mentioning any names.....but one gentleman that had been after me for months to race him got his wish. 
Leaving from Sandy Point in Yorktown, VA he was driving his mother's old cutlass and I pulled up next to him in the passing lane, gave him the ol' head gesture and left him.  I guess you could say we never raced, because he never caught up.  Dad was just sitting there with both elbows on his knees, raised his eyebrows first and then looked up at me.  Oh no - I'm in trouble!  At 48 years old, he's going to ground me!  He says, "Did you win?" ......................  "Well I wouldn't be telling you about it if I didn't."  He gave me a thumbs up.
That's pretty much the story behind RED FIFTY SIX.  I not only loved the truck, but loved the man, loved the good times and laughter, loved the inspiration it gave me then and the same inspiration I've carried around with me my whole life.  Thumbs up Dad!  Thumbs up!
09 10 01 10